Saturday, June 30, 2012

Event Announcement - Guest Hosting EP Series - Fenugreek Leaves and Green Chili


EP Series comes to Palakkad Chamayal!

Friends, I am glad to guest host the EP Series – Herbs n Spices, which was originally started by Julie. I thank Julie for giving me this wonderful opportunity to host this lovely event.


I have chosen my favourites – Fenugreek Leaves and Green chilli.

A little info about the chosen herb and spice

They are known by different names in India like Methi in Hindi, Menthya in Kannada, Vendayam in Tamil, Menthulu in Telugu and Uluva in Malayalam.
Fresh fenugreek leaves are bitter in taste and are recognized as a powerful herb. Add these leaves to any kind of dish like dals, curries, rice or even while making chappathis. You are sure to love its aroma and flavour.
They are known to be very high in iron as well as having significant levels of potassium, fiver and calcium. Few diet experts say that the leaves are nearly healthier than the spinach in providing an excellent dose of vitamin K. They help in stabilizing sugar levels in the body and are a boon to the diabetic. They also help in digestion, curing liver problems, anaemia and as an anti inflammatory.
Green chilli is an integral part of Indian cooking. I don't think even a single day, in an Indian household would go by without the use of green chillies. They are used in almost all Indian savory dishes like curries, dals, breads and appetizers. They are very high in Vitamin A and C.

Now to the rules:

1. The event runs from 1st to 31st July 2012.
2. The theme for this month is "Fenugreek Leaves and Green Chillies". You can use one ingredient in a dish or use both but that ingredient should be one of the main ingredients. It can be anything from a  starter, main dish, snack to dessert. (Recipes which don't follow this rule will not qualify for the event)
3. Only Vegetarian entries will be accepted. 
4. Bloggers and Non bloggers can participate. Please send in your recipes to kaverivenkatesh@gmail.com with the following details-

              Your Name-
              Blog Name-
              Recipe Name-
              Recipe URL-
              Pic of the Dish
5. Recipe must be linked to Julie's announcement page and to my page.
6. Send in any number of entries.You can link in your old entries too (limiting 2 per person), just add the logo and the link under the post (2 archived posts)
7. Usage of logo is appreciated for all entries.

There are 4 awards for the BEST INNOVATIVE RECIPE AWARD, TOP CONTRIBUTOR AWARD,BEST HEALTHY DISH AWARD & PARTICIPATION AWARD.

So, Folks put on your innovative caps and think tight, do right and link in your recipes at the earliest before 31st July,2012.
.
Best Wishes to All !!!!

Thursday, June 28, 2012

Beetroot Pulao


Schools have reopened. Though children enjoy their vacations to the maximum, it is only when the school reopens that they get back into their routine and are engaged productively throughout the day. As much as my daughter loves her holidays, she equally enjoys going to school as well. Once the school reopens, she doesn’t like to miss her classes even a single day.

Children get all excited, days prior to the start of the academic session. They are thrilled to go shopping for their new bags, pencil box, lunch box, water bottle etc. My daughter loves pink, and she makes sure that all her school accessories are of her favourite colour. She is even particular about the label that goes on the cover of the books. They have to have the Barbie picture.

Children are all set and happy. What about the mothers? I guess moms also are happy that their children have stepped into yet another year of learning and playing. But what is a big struggle for mothers is to make their children have some healthy wholesome food while they are busy with their books and friends. So here is a really healthy, delicious and really colourful meal that can be put together in no time – Beetroot Pulao. It is perfect for your kids as well as your lunch box.


Serves - 2
What you’ll need
  1. Cooked Rice – 2 ½ Cup
  2. Beetroot – 1 Medium
  3. Onion – 2 Medium
  4. Green Chilly – 1 or 2, slit
  5. Chilly Powder – ½ tsp
  6. Coriander Powder – 1 tsp
  7. Amchur Powder – ½ tsp
  8. Cumin Seeds – 1 tsp
  9. Bay Leaf – 1
  10. Cardamom – 2
  11. Cloves – 2
  12. Cinnamon – a small piece
  13. Cashenuts - few
  14. Ghee – 2 tsp
  15. Oil – 2 tsp
  16. Coriander Leaves – for garnish

Method
  1. Heat a pan or kadai with the oil and ghee.
  2. Add the cumin seeds, bay leaf, cardamom, cloves and cinnamom. Sauté for a minute.
  3. Next add in the thinly sliced onion and slit green chilly. Fry till the onions turn light brown.
  4. Now add the grated beetroot and for a minute. Cover and cook on medium flame for 4 to 5 minutes.
  5. Next add the coriander powder, red chilly powder and amchur powder. Mix well.
  6. Now add the cooked rice and salt to taste. Mix thoroughly till the rice gets heated up.

Garnish with fresh coriander leaves.

Serve as it is or with a raitha of your choice.


Linking to Show me your HITS - Beets and Carrots hosted by Anusha.

Tuesday, June 26, 2012

Vendakkai Thayir Pachadi


While browsing through my recipes, I found that I have not blogged a single Thayir Pachadi recipe. Actually, I am not a big fan of thayir pachadis or raithas. Maybe that’s the reason why I haven’t posted one.  Even though it’s not something which I would savour to its last drop, it does find its way into my kitchen very frequently – reason, my children. Both are big fans of it and they can simply have bowlfuls of the pachadi and say that they’ve finished lunch!

 I prefer this Lady’s finger pachadi over the numerous varieties of thayir pachadis. So I thought of opening this category with my favourite choice.

The title should have rightly been Venkakkai Kichadi – as curd based pachadis are known as Kichadi and form an important part of the Sadhya or feast. But in our house we just refer to them as Thayir pachadi so I stuck with that name. You could use other veggies, like cooked ashgourd pieces, or banana stem pieces as well instead of lady’s finger. Tastes best as an accompaniment with rice and Molagootal or Molaguhsyam.

Serves - 4
What you’ll need
  1. Lady’s Finger /Vendakkai – 200 gms
  2. Green Chillies – 1 or 2
  3. Fresh Grated Coconut – ½ cup
  4. Fresh Thick Curd – 2 Cups
  5. Mustard Seeds –1/4 tsp
  6. Curry Leaves – few
  7. Salt to taste
  8. Oil – 2 tsp

For Tempering
  1. Oil – 1 tsp
  2. Mustard Seeds – 1 tsp

Method
  1. Wash and pat dry the lady’s finger. Cut into small pieces.
  2. Heat a kadai with oil. Add the lady’s finger pieces, cover and cook for about 5 minutes.
  3. Remove the lid and fry for another 5 to 10 minutes, on low heat, stirring every now and then.
  4. Once the lady’s finger is fried well, add salt and mix well.
  5. Remove from heat. And let it cool.
  6. In the meanwhile, grind coconut, green chillies, mustard seeds and curry leaves to a smooth paste adding a little water.
  7. Beat the curd well, add the coconut paste and fried lady’s finger. Mix well and check for seasoning.
  8. Heat a small frying pan with a tsp of oil. Add mustard seeds. Once they splutter pour the seasoning over the pachadi.


That’s it, delicious Vendakkai Thayir Pachadi is ready.

Serve as an accompaniment with rice and molagootal or Molagushyam or even with rotis.

Linking this to The Kerala Kitchen hosted by Julie.

Thursday, June 21, 2012

Kadachakka Thoran/ Breadfruit Thoran


My stay in Bangalore this vacation was really fruitful. Fruitful in terms of my blog, I tried out many different recipes and also asked my mother to prepare some of the traditional recipes which I had not tried or had for a long time.  One of my friends got this Kada Chakka, or breadfruit from Kerala. It was from the tree grown in their backyard.I was setting my eyes on this fruit for the first time. The name Kada Chakka made me picture it as a small jackfruit. It did look like a small jackfruit.  Still I had my doubts about its taste. But my friend persuaded me to take it home and asked me to just make a simple mezhukkuperatti or thoran with it. I hesitantly took it home. My mom also had never tasted it but had seen it and had heard about it.  

The next day, we prepared a thoran with it and it really tasted good. It tasted very much like potatoes. And all the flavours blended very well with it. My daughter liked it a lot. So the next time I sight it somewhere I am sure going to grab this fruit and try out different recipes. For those who would like to know more about breadfruit please visit this page.


What you’ll need
  1. Kada Chakka – 1, medium
  2. Grated Coconut – 3 tbsp
  3. Green Chilly – 1 or 2
  4. Curry Leaves – few
  5. Turmeric Powder – ¼ tsp
  6. Salt to taste

For Tempering
  1. Oil – 2 tsp
  2. Mustard Seeds – 1 tsp
  3. Urad Dal – 1 tsp

Method
  1. Peel the skin of the bread fruit and chop into medium sized cubes.
  2. Steam cook the bread fruit pieces in a pressure cooker for 2 whistles. Do not add any water to the pieces while cooking.
  3. Heat a kadai with oil, add mustard seeds and urad dal. Once the mustard splutters and urad dal turns light brown, add the steamed bread fruit pieces. Add turmeric powder and salt to taste. Mix well. Fry on medium flame for 3 to 4 minutes.
  4. In the meanwhile, grind coconut, green chilly and curry leaves to a coarse paste, without adding water.
  5. Add this ground paste to the bread fruit pieces and mix well. 
  6. Remove from heat.

Serve as an accompaniment to rice and Sambar or Rasam.


Linking it to the Kerala Kitchen hosted by Julie.

Monday, June 18, 2012

Milagu Vellam


Milagu Vellam or Molugu vellam as we call it colloquially is a typical Kerala Iyer recipe, something similar to the popular Moru Kachiyathu. It is really very simple and can get ready in a jiffy if you have some curds handy. Milagu refers to Pepper and vellam means water, it’s nothing but a watery concoction of pepper and curds. Milagu vellam along with vazhaka chenai mezhukkuperatti, is a meal that is served to most convalescing mothers.

This dish was not made very frequently in my house, but it was a regular fare at my maternal grandparent’s home. My grandfather was very picky about what he ate and was very particular about the timings too. Lunch would be served exactly and 10:30 am, followed by tiffin anywhere between 2:30 to 3 pm and then dinner exactly at 8 pm. He would never snack on anything in between. Lunch would almost always consist of some coconut and dal based gravy like Sambar, Molagootal, Moru Kootan or Poricha Kuzhambu with some thoran, kootu or pachadi. Dinners would be lighter, (though he used to have only rice), wherein Rasam, Vatha Kuzhambu, Molagutiam or Milgu Vellam would be served along with a mezhukkuperatti. So, that’s how I got introduced to this dish and ever since it has been my comfort food. What is yours?


Serves – 3 to 4
What you’ll need
  1. Thick Curd – 1 Cup, (preferably a day or 2 old, should be slightly sour)
  2. Pepper Powder – ½ tsp
  3. Turmeric Powder – ¼ tsp
  4. Ghee – 1 tsp
  5. Curry Leaves - few
  6. Salt to taste

For Tempering
  1. Oil – 1 tsp
  2. Mustard Seeds – ½ tsp
  3. Cumin Seeds – ½ tsp
  4. Fenugreek Seeds – ¼ tsp
  5. Dried Red Chilly – 1, broken

Method
  1. In a bowl add the cup of curd and add an equal amount of water and whisk well. Keep it aside.
  2. In a vessel, add about ½ cup of water (100 ml), and add the turmeric powder and pepper powder. Mix well and place it on heat.
  3. Allow this to boil on medium flame till almost all the water has evaporated.
  4. Now add a tsp of ghee and mix very well. It will all come together.
  5. Reduce flame and slowly add the whisked curds, stirring all well.
  6. Simmer till the mixture starts frothing up. Don’t allow to boil.
  7. Now add some fresh curry leaves and remove from heat.
  8. Add salt to taste and mix well.
  9. For the tempering, heat a small frying pan with oil, add the mustard, cumin and fenugreek seeds, and lastly add the dried red chilly. Once the red chilly turns bright red, remove from heat and pour over the milagu vellam. (take care not to burn the fenugreek seeds, else they will give a bitter taste)


That’s it, serve warm with hot rice and any curry of your choice.


Linking this to the Kerala Kitchen Event hosted by Julie.

Wednesday, June 13, 2012

Special Chole - No Onion No garlic


Chole is a predominantly Punjabi dish whose main ingredients are Chickpeas, onions, garlic, and tomatoes. It is usually served with a fried Indian Bread called Bhatura. Chole has become a common name even in South Indian households. I for one have been having chole since I don’t know when, though rarely with Bhaturae. They taste good with any Indian bread, like rotis or parathas. They can be served even with rice.

To me chole always meant onions and garlic. I never imagined preparing it without its two main ingredients. Now, while browsing through Deeksha’s space, who is my blog hop partner for this month, I saw the recipe for Special Chole. While going through the recipe, I realised that the ingredient list does not include onion or garlic. Since my Mil, does not take onions on most days, I thought this would be the perfect thing to try.

Believe me; I did not miss the taste of onions or garlic, the chole turned out to be as tasty as ever. We had it for dinner with some phulkas.


Serves – 4
What you’ll need
  1. Brown Chickpeas – 1 cup, soaked overnight
  2. Potato – 1 (optional)
  3. Tomato – 4 big, ripe
  4. Ginger – 1 inch piece
  5. Green Chilli – 1, slit
  6. Turmeric Powder – ½ tsp
  7. Red Chilli Powder – 1 tsp (adjust according to taste)
  8. Coriander Powder – 1 ½ tsp
  9. Garam Masala – ½ tsp
  10. Chana Masala – ½ tsp
  11. Cumin Seeds – ½ tsp
  12. Cloves – 2
  13. Cardamom – 2
  14. Cinnamon – 1 small piece
  15. Bay Leaf - 1
  16. Ghee/Clarified Butter – 1 tbsp
  17. Fresh Coriander Leaves – few sprigs, for garnishing

Method                     
  1. Wash the soaked chickpeas in one or two exchanges of water.
  2. Pressure cook the soaked chickpeas and the potato for 3 to 4 whistles.
  3. Grind the tomatoes and ginger into a smooth paste.
  4. Heat a Kadai with Ghee, add cumin seeds, cloves, cardamom, cinnamon and bay leaf.
  5. Next add the tomato ginger paste, turmeric powder and sauté  for 6 to 8 minutes or till the ghee separates out.
  6. Now add the spice powders, chilly powder, coriander powder, garam masala and chana masalas.
  7. Fry for another minute or two.
  8. Now add the cooked chickpeas and boiled cubed potatoes. Add salt and mix well.
  9. Add about 1 ½ cups of water and let it simmer for about 5 minutes.


Delicious chole is ready. Serve hot with any Indian Bread.
Linking this to Blog Hop Wednesday

Monday, June 11, 2012

Baked Nippattu


We are into yet another edition of Magic Mingle an event started by Kalyani. This month’s magic ingredients were APF and Coriander Leaves. Things that immediately came to my mind were savoury buns, masala chappathis, khara biscuits etc.

Bangalore is famous for its Iyengar Bakeries. Some of the popular goodies sold in these bakeries include Masala Sandwich, Khara Buns, Aloo Buns, Nippattu, Khara Biscuits etc. I am a big fan of all these, but my favourite among them is the Nippattu and Khara Buns. I remember having these quite regularly, from a bakery near our house in Domlur. Nothing to beat the Iyengar Bakeries of Bangalore.

Nippattus are very similar to Thattais, but the flour used is different. Whereas Thattai makes use of rice flour, Nippattus are made using Maida. Both are traditionally deep fried. I have attempted a baked version of the nippattu. They turned out really crisp and delicious. I have adapted the recipe from here and here. So here is my version of Bangalore’s famous savoury snack Nippattu.


What you’ll need
  1. All Purpose Flour/Maida – 1 Cup
  2. Wheat Flour – 1 Cup
  3. Onion – 1 big, finely chopped
  4. Green Chillies – 2 or 3, finely chopped (adjust acc to taste)
  5. Fresh Coriander Leaves – a handful, finely chopped
  6. Sesame Seeds - 4 tsp
  7. Salt – 1 tsp
  8. Sugar – 2 tsp
  9. Baking Soda – 1 tsp
  10. Oil – ½ Cup
  11. Warm Water – ¼ Cup

Method
  1. In a wide bowl, add the maida, wheat flour, salt, sugar, sesame seeds and baking powder. Mix well.
  2. Now add the finely chopped onion, green chillies, and coriander leaves. Mix well.
  3. Now add the oil and mix again, until the oil is well incorporated.
  4. Now add water little by little and knead into smooth dough.
  5. Cover with a damp cloth and set rest the dough for about 30 minutes.
  6. Preheat oven to 160 degrees C.
  7. Pinch out lemon sized ball out of the dough.
  8. Place it between 2 thick plastic sheets and press to flatten the ball.
  9. Flatten it well with the help of your finger tips.
  10. Now, cut out a neat circle with the help of a lid.
  11. Gently remove this disc on to a greased baking tray. Poke the disc with a fork to avoid fluffing up.
  12. Continue with the remaining dough in a similar way.
  13. Bake for 15 to 20 minutes, flipping once after 10 minutes.
  14. Cool completely and store in airtight containers.


That’s it, delicious nippattu ready. Serve along with evening tea or coffee.


Note:

Keep an eye towards the end of the mentioned baking time, they tend to burn easily.
Flatten the discs very thin to get crispy nippattu.


Sunday, June 10, 2012

Roundup of SYF & HWS Series - Fennel Seeds


Here is the round up of the SYF & HWS – Fennel Seeds. I would like to thank Anu for giving me the opportunity to guest host this wonderful event.

I received a total of 21 entries.  I thank all my blogger friends who took out their time to send in entries for the event.

Shobha of Food Mazaa has sent in 2 wonderful entries:


Preethi of Follow Foodie has sent in Turnip Stew


Priya of Priya’s Versatile Recipes has sent in 4 beautiful entries


Poornima of Poorni’s Recipes has sent in 2 flavorful recipes


Archana of The Mad Scientist’s Kitchen has sent in Mukhwas


Julie of Erivum Puliyum has sent in 2 delicious entries


Sobha of Good Food has sent in a very healthy recipe SoyaChunks Bhurji


Roshni of Roshni’s Kitchen has sent in 3 yummy entries


Anjana of Maayeka has sent in this traditional Kashmiri dish Chok Vangun


Hema of Aromatic Cooking has sent in this flavourful Eggplant Rice


Akila of Learning to Cook has sent in this yummy MushroomMasala


Rupali of Recipe Grab Bag has sent in this unique Nilgiri Korma


Here comes my entry for the event Bhindi Do Pyaaza


 Hope you all enjoyed the visual treat.

Thursday, June 7, 2012

Jam Tart


We the Gourmet Seven decided on the theme of Pies/Tarts/Quiches for this month from the Smitten Kitchen. Though I very readily agreed to the theme, only after a while did it don on me that I had tasted tart ages ago and I did not remember how it tasted. I am really apprehensive about cooking something which I haven’t tasted before. The reason is very simple, I really can’t justify whether the outcome is the expected one.

Last week I happened to visit one of my relatives. They talked about a new bakery that had opened nearby, which sold all eggless bakes. My luck, I should say, among other baked goodies like pastries, and cookies they had also bought baklava and a tart. They very happily shared some of it and the taste is still lingering.

So finally, I gathered all my courage and decided to take up the challenge of baking my first tart – Jam Tarts. The experience was really good. Since the pastry shell called for eggs, I slightly modified the recipe and it worked out well for me. The crust was crisp and flaky and the jam filling not only made it look pretty but attracted my children immediately. Next time, though, I would like to go for something savory.


Adapted lightly from Smitten Kitchen

For the crust
  1. All Purpose Flour – 1 cup
  2. Powdered Sugar – 5 tsp
  3. Oil – ½ cup
  4. Cold Milk – 4 tbsp

For the filling
  1. Jam or any kind of fruit preserve (I used Mixed Fruit Jam) – ¼ cup

Method
  1. Preheat oven to 180 degrees.
  2. In a wide bowl mix the dry ingredients.
  3. Now add the oil and lightly mix with your fingers until it resembles bread crumbs.
  4. Now add in the milk and gather to form dough. Do not work too much on the dough.
  5. Press the dough into un-greased tart mould.
  6. Poke holes on the base and sides of the dough.
  7. Bake it for about 20 to 25 minutes.
  8. In the meanwhile, take the jam in a bowl and stir well, so that it is loosened.
  9. Fill the pre-baked tart shell with Jam. Fill 3/4th of the shell, or the jam will boil over while baking.
  10. Bake the tart for another 15 to 20 minutes or till the edges are browned.
  11. Cool the tart completely before removing from the molds else it may crumble.


 Check out what the other Gourmets- Anamika, Anusha, Radhika, Sangeetha, Vardhini and Veena are upto......


Monday, June 4, 2012

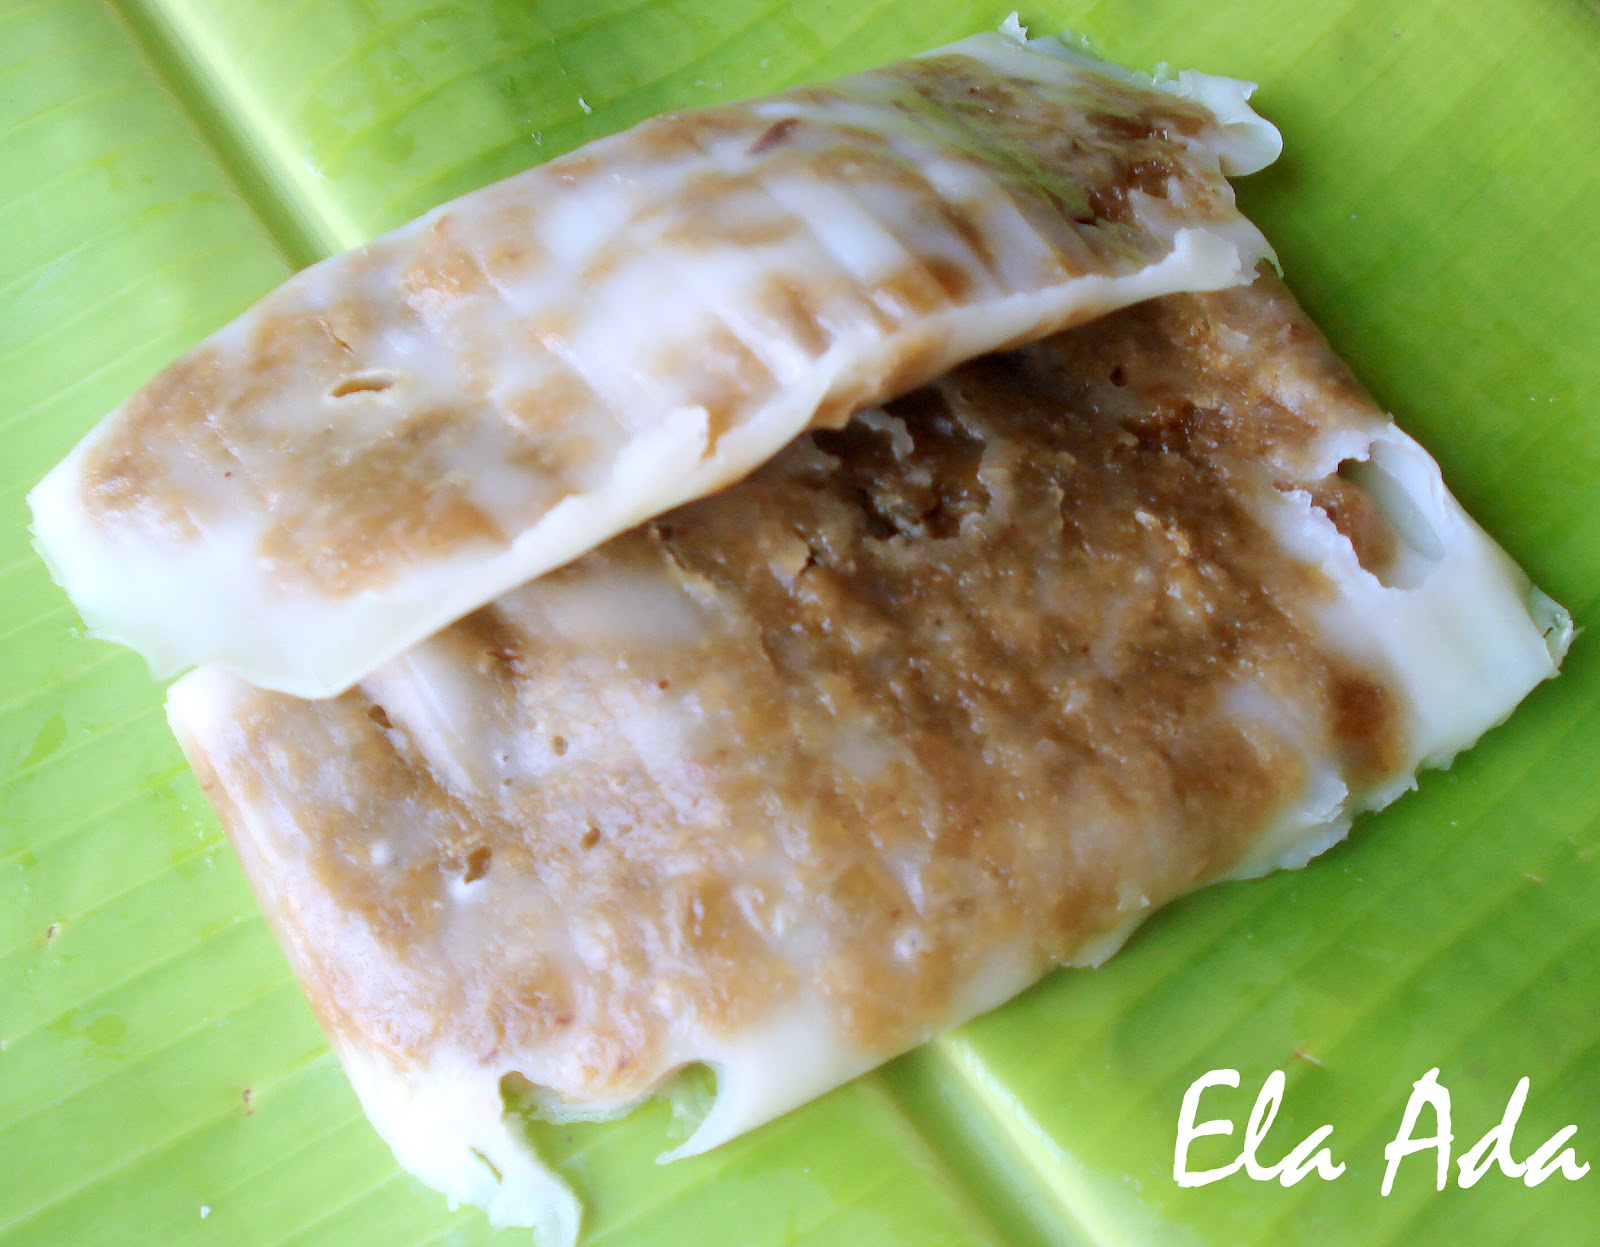
Elai Adai/Ela Ada


Elai Adai is a steamed delicacy, very popular in Kerala. Elai refers to plantain leaf and ada refers to the steamed flat rice cake filled with a mixture of grated coconut sweetened with jaggery and flavored with cardamom.

Though elai adai is a family favorite but it is not prepared as often as I would’ve liked to. My grandmother used to prepare it mostly in the summer as she liked to flavor the filling with jackfruit pieces or jackfruit preserve. So the trend has been continuing and by default all of us make it during the jackfruit season. Not that the filling doesn’t taste good without the jackfruit, but it definitely adds to the flavor.  

There are different ways of preparing the outer covering. Some use rice flour, some wheat flour and some others even use maida. Today’s recipe is one which has been used in our family for more than 3 generations now. So here comes the recipe:


What you’ll need

For the outer covering
  1. Raw Rice – 1 Cup
  2. Idly Rice – 1 Cup
  3. Salt – a pinch

For the filling
  1. Fresh Grated Coconut – 1 Cup
  2. Powdered Jaggery – ½ Cup
  3. Finely Chopped Jackfruit Pieces – 1/2 Cup
  4. Ghee – 2 tsp

Plantain Leaves - 6 to 8

Method
  1. Wash and rinse both the rice for 4 hours.
  2. Grind into a smooth paste adding water whenever necessary. The batter should not be very runny or very thick. Add a pinch of salt. Mix well and keep aside.

For the filling
  1. Heat a kadai. Add the powdered jaggery and ¼ cup of water. Let the jaggery dissolve completely. Strain for impurities.
  2. Pour back into the kadai and bring to a boil on medium heat. Take care not to burn the syrup. Once it reaches one string consistency add the grated coconut, jackfruit pieces and keep stirring.
  3. Stir until all the moisture evaporates and you start seeing frothy bubbles on the sides of the kadai.
  4. Remove from flame. Add 2 tsp of ghee, mix well. Let this mixture cool down.

In the meanwhile, prepare the banana leaves.
  1. Try to select leaves without the middle vein of the leaf. (Also called Tiffin Elai or Elai Cheendu)
  2. Wipe the leaves with a moist cloth.
  3. Then place one leaf at a time on the gas flame for about, flipping and turning the leaf so that the leaf is slightly wilted. This step helps in making the parcel easy.

Preparing the adais
  1. Take a prepared banana leaf. Grease very lightly with ghee.
  2. Pour a spoonful of the prepared rice batter and spread like a small dosa. Should not be very thin.
  3. Now place some of the filling to cover half of the dosa.
  4. Fold the banana leaf from the opposite side. Fold both the sides and the open side as well so as to make a closed parcel.
  5. Steam cook the prepared parcels for 10 to 15 minutes.

Delicious Elai Adai is ready to eat.


Variations:
  1. You could prepare the filling with only grated coconut and jaggery flavored with cardamom powder.
  2. You could add sliced bananas instead of Jackfruit. Add the bananas at the end, give a good mix and remove the filling from heat.
  3. You could also add Chakka Varatti (Jackfruit preserve) to the prepared filling and mix well and use.
  4. The filling can be prepared a day or 2 in advance. It stays good for about  10 days when refrigerated.

 Linking this to Kerala Kitchen hosted by Julie.
Related Posts Plugin for WordPress, Blogger...