Tuesday, January 31, 2012

Chocolate Truffles - For The Gourmet Seven


Here comes my first post for The Gourmet Seven. Chocolates are synonymous with Love, be it the love shared between a parent and a child or a husband and a wife or simply between two friends. With Valentine’s Day around the corner, love is in the air. So the theme for this month was chocolate and the source was BBC Good Food. Scouring the website was a visual treat in itself. To tell you the truth I was going through it for the first time and I have a big list of bookmarked recipes to try out.  For today’s post I chose these simple yet decadent Chocolate Truffles. These could be the perfect gift for your loved ones.

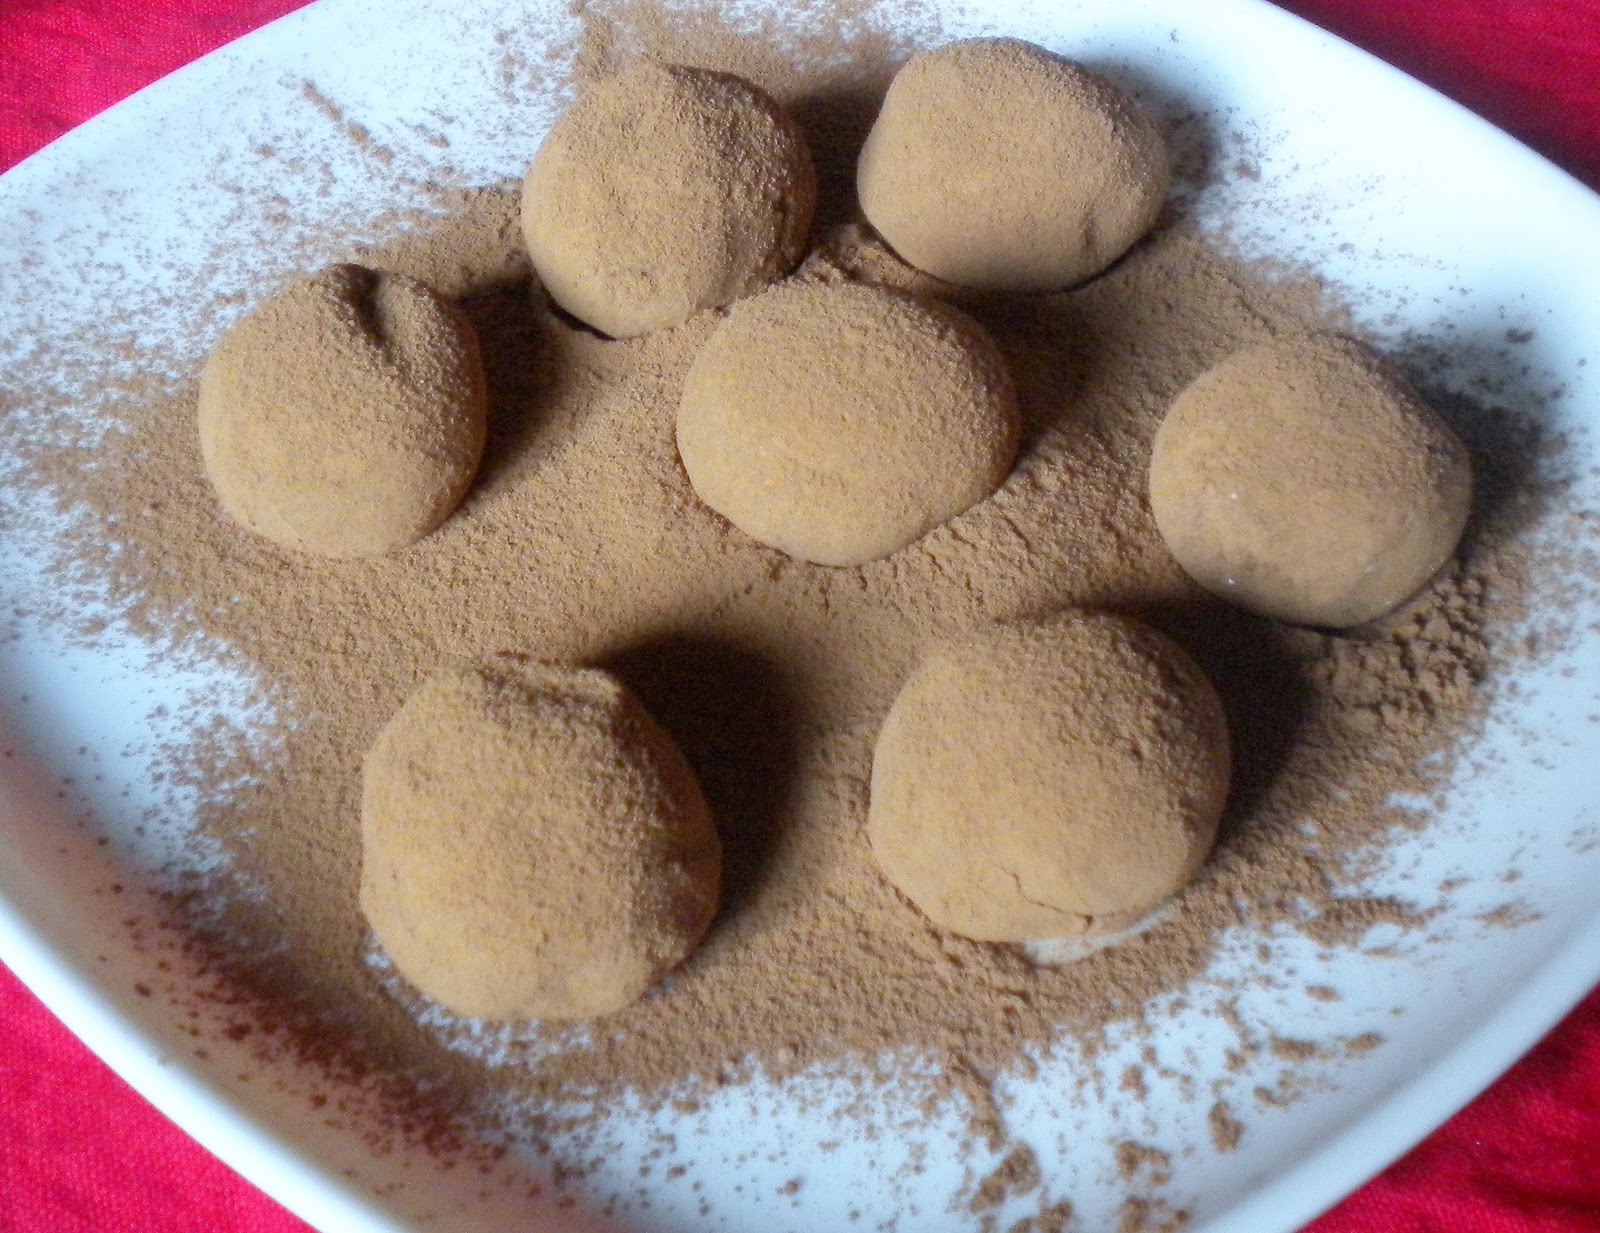
Chocolate truffles, rich bite sized rounds, made from a creamy mixture of chocolate, cream and butter. These are generally flavored with a small quantity of alcohol or any other extracts or fruit purees. A chocolate Truffle is purposefully rolled into mis-shaped rounds to resemble their namesake fungi that grow around the roots of trees in France and Italy. These are traditionally rolled in unsweetened cocoa powder to give them the look of dirt that the real fungi grow in, they can also be coated in toasted chopped nuts, icing sugar or toasted desiccated coconut.


What you’ll need
  1. Bittersweet Chocolate or Milk Chocolate – 250 gms
  2. Heavy Cream or Whipping Cream – 125 ml
  3. Unsalted Butter – 2 tbsp

For coating the truffles
  1. Unsweetened Cocoa Powder
  2. Icing Sugar
  3. Toasted Chopped Nuts
  4. Toasted Desiccated Coconut


Method
  1. Chop the chocolate into small pieces and place it in a glass bowl.
  2. Add the cream and butter to a saucepan.
  3. Heat this on a medium flame and remove from heat just when you start seeing the sides of the cream bubbling. (Do not let it boil)
  4. Add this cream and butter mixture to the chocolate and let it sit for about a minute.
  5. Now slowly stir in and mix well, until and chocolate is melted and blended well with the cream. This is called Ganache.
  6. If the chocolate hasn’t melted fully, microwave for about a minute.
  7. Mix it well, cover with a cling film and refrigerate for several hours or overnight until the ganache is firm.
  8. Keep the ingredients for coating the truffles ready in separate bowls.
  9. Remove the set ganache from the refrigerator, scoop out about a tbsp of ganache, with the help of a spoon or a melon baller or a small ice cream scoop, and shape them into balls quickly. Roll into any of the coatings of cocoa powder or chopped nuts, icing sugar etc. The choice is entirely yours. Place the prepared truffles on a plate and keep the refrigerated until serving.


Note:
  1. I have not flavored them with any kind of alcohol or puree. If you want to, then add it to the ganache mix well and refrigerate.
  2. Work quickly while preparing the truffles as the ganache tends to melt easily.
  3. Keep the truffles always refrigerated.
  4. They store for about a couple of weeks when refrigerated.


Monday, January 30, 2012

Lauki ki Kheer


Yesterday my lil one turned 2. Time has just flown by. I still remember the day, my younger one, came into our lives. She came into this world on Jan 29th 2010 at 3:00 am. And since then, till today, there has not been a single day that she hasn’t woken up at around 3.00 am. I don’t know what kind of coincidence it is! But somehow she just wakes up at around that time cries for a few minutes and then back to sleep.

Apart from that, obviously, she keeps me busy the whole day, except for the 2 hours she sleeps in the afternoon and that’s time I get to do some blogging. In one of my older posts I had mentioned how she had just started talking, and now she talks continuously. Her interests have also changed, earlier, she was not interested in anything that came on T.V. rather would run around the house doing some mischief or the other, but now, she is very attentive and grasps all the catchy commercials and tamil numbers, her favorite being Kolaveri and Chammak Challo!

So yesterday, for her birthday, we ordered a cake and I prepared this Kheer. It was just a family affair. I prepared this kheer for the first time and it was liked by all. Both my kids, who generally don’t like kheers, were asking for more. What more do I want!


Serves: 5

What you’ll need

  1. Milk – 1 litre ( 5 cups)
  2. Grated Bottlegourd/ Lauki – 3 cups
  3. Sweetened Condensed Milk – ¼ cup
  4. Sugar – ¼ to ½ cup (adjust according to taste)
  5. Green Cardamom/ elaichi – 4
  6. Ghee – 1tbsp

Method

  1. Pour the milk in a heavy bottomed vessel and bring it to a boil.
  2. Once the milk starts boiling, let it simmer for about 10 minutes or till the milk has reduced by 1/4th. Keep stirring in between.
  3. Wash, peel and deseed the bottlegourd. Grate it. Squeeze out the excess water from the gourd.
  4. Heat another Kadai with ghee. Add the grated bottle gourd and sauté for 4 to 5 minutes.
  5. Once the milk has reduced, add the condensed milk and mix well.
  6. Now add the sautéed gourd to the milk and let it simmer for another 5 to 8 minutes.
  7. Next add the sugar, mix well and cook for another 7 to 8 minutes.
  8. Coarsely powder the cardamom and add it.
  9. That’s it, yummy Lauki ki kheer is ready.


Serve it warm or cold.

Note:
You could fry cashews and raisins in a little ghee and add for extra garnish.

Linking this to Veggie/Fruit of the month – Bottlegourd hosted by Raji

And to ABC Series – Desserts, hosted by Ramya
And to Cook Eat Delicious hosted by Suma  

Friday, January 27, 2012

Tomato Rice


Yesterday, I had some guests and after hosting the dinner, I had lots of leftovers, especially rice. After the night’s tedious work I woke up quite late today morning and was wondering what to prepare for my daughter’s lunch box. While rummaging through the fridge, I saw some ripe tomatoes, begging for attention.  So I decided to prepare this quick fix tomato rice, perfect for a lunch box and also a perfect way to use up my leftover rice.

 I think each household has a different way of preparing this dish, with variations in the blend of spices. I have tasted lots of versions and I love each and every one of them. I myself prepare 2 to 3 versions. The one I am sharing today is by far the simplest one.


Serves 2

What you’ll need
  1. Cooked Rice – 2 ½ cups
  2. Onion – 2 medium
  3. Tomatoes – 4 Medium
  4. Fresh/Frozen Green Peas - 2 handfuls (optional)
  5. Green Chillies – 1
  6. Mustard Seeds – 1 tsp
  7. Cumin Seeds – ½ tsp
  8. Fennel Seeds – ½ tsp
  9. Turmeric Powder – a big pinch
  10. Chilly Powder – ½ to 1 tsp
  11. Garam Masala Powder – ½ tsp
  12. Curry Leaves – a few
  13. Coriander Leaves – few
  14. Salt to taste
  15. Oil – 2 to 3 tsp
  16. Ghee – 2 tsp

Method
  1. Finely chop onions and tomatoes. Slit the green chilly.
  2. Cook the green peas in water, drain and keep aside.
  3. Heat oil and ghee in a Kadai, once the oil is heated, add the mustard seeds, cumin and fennel seeds. Also add in the curry leaves.
  4. Next add the chopped onions and slit green chilly, sauté.
  5. Once the onions start browning, add the turmeric powder, and fry for a minute.
  6. Next add in the chopped tomatoes and salt. Fry till the tomatoes turn mushy and the oil starts separating.
  7. Now add in the green peas, chilly powder, and garam masala powder. Mix well.
  8. Finally add the cooled and cooked rice and mix well. Adjust salt.
  9. Garnish with chopped coriander leaves.


Tasty Tomato Rice is ready.

Monday, January 23, 2012

Vegetable Cutlets

The other day while surfing channels, I saw the advertisement for Vim Liquid, where the lady says, “Cooking is rather simple, in fact, it is only a matter of spoons, a teaspoon of this and a teaspoon of that.”

Is cooking really only a matter of spoons? Do everybody who follow recipes to the dot from a cookery book, end up with a delicious meal? I personally don’t think so. In my opinion, cooking is an art, which is developed through patience and practice. It is not mathematics or physics that you write in some formulae and are sure to get the right result. Haven’t there been times, when you’ve added all the right ingredients, in the right proportions and followed the recipe exactly but ended up with a failed venture? Also, though most people cook, only few have it in them to whip up tasty food each and every time. What do you say friends?

Today I am sharing the recipe for a simple vegetable cutlet, which is one my favorite snacks. I love the cutlet that is served in the Brindavan Express Train, from Bangalore to Chennai. No, No, the recipe is not from the chief cook of Brindavan Express, rather it is my SIL’s MIL’s :)


Makes about 20 cutlets

What you need
  1. Potatoes – 2 big
  2. Carrots – 2
  3. Beetroot – 1 small
  4. Green Peas – 2 handfuls
  5. Bread Slices – 5
  6. Fresh Coriander Leaves – little
  7. Mint Leaves – 10 – 12 leaves
  8. Fennel Seeds – 1 tsp
  9. Coriander Powder – 1 tsp
  10. Cumin Powder – ½ tsp
  11. Chilli Powder – ½ to 1 tsp (acc to taste)
  12. Garam Masala Powder – ½ tsp
  13. Salt to taste
  14. For coating the cutlet
  15. Maida/All purpose Flour – 2 tbsp
  16. Water as required
  17. Bread Slices – 7 to 8
  18. Oil to deep Fry
Method
  1. Pressure cook the potatoes, carrots and beets. Once cool, remove from cooker and mash the vegetables thoroughly.
  2. Boil the green peas separately in water. Strain and keep aside.
  3. Add the boiled green peas and mix well.
  4. Break the bread slices into smaller pieces and mix it well with the vegetables.
  5. Add Fennel seeds, coriander powder, cumin powder, chilli powder, garam masala powder and salt to taste. Mix everything well.
  6. Finally add finely chopped coriander leaves and pudina leaves and mix.
  7. Shape into cutlets and keep aside.
  8. Take the flour in a bowl, add water little by little and make a paste to coat the cutlets.
  9. Powder the bread slices in a mixer and keep aside.
  10. Heat oil for deep frying in a pan.
  11. Take the prepared cutlets one by one, coat it in the flour paste and then roll it in the bread crumbs.
  12. Deep fry the cutlets until they are well browned.

Note:
  1. You can avoid the beets. But I personally like beets in my cutlets.
  2. While pressure cooking the vegetables, add very little water in the vegetables, else the veggie mixture may become too watery and you will find it difficult to shape.
  3. In case you feel the veggie mixture is very soggy, add more bread slices. It will absorb the moisture.
  4. Shallow fry the cutlets for a healthier version.

Friday, January 20, 2012

The Gourmet Seven – On a Gastronomic Journey


Blogging started as a past time hobby but has now become a part of me. It has not only given me a window to express myself and showcase my recipes, but also introduced me to a beautiful world of virtual friends. Though we have not met in person, our faces light up with child like delight as soon as we see a good post or a beautiful picture on a friend’s space.


So what is common to us? You’re right!  No marks for guessing, we are all bloggers whose common interest is cooking. When like minds met, The Gourmet Seven was ignited and you will see it glow, in the coming months.


So what is the Gourmet Seven all about?
In the first week of every month, starting Feb 2012, The Gourmet Seven will serve a visual feast of gourmet food from a commonly available recipe source.  Our journey starts with some chocolaty treats. So come join us, in this Gastronomic Journey.

Wednesday, January 18, 2012

Manga Saadam/ Mamidikaya Annam/ Raw Mango Rice


A couple of month’s back I had won a giveaway for the event Healing Foods – Coconut, sponsored by Siri. She sent me this wonderful book, Cooking At Home with Pedatha. Thanks a lot Siri. The book is a collection of simple, traditional and authentic Andhra Recipes. I was stunned by the way these simple recipes were photographed. Each one looks tempting and delicious. I tried out a few recipes from the book and today I am sharing one of them: The famous Mamidikaya Annam or Manga Saadam/Mango Rice.

Raw mango is widely used in most cuisines during the season, and so is the case in Andhra. Raw mango or mamidkaya is used in dals, gravies, chutneys etc. I got few fresh raw mangoes and some raw bananas, right from the backyard of my H’s Granny’s place. So armed with these fresh mangoes I set about to make this simple, tangy yet very delicious rice. I packed it for my lil ones lunch and we had the remaining. It was sure shot hit with my family, who are ardent mango lovers.


What you’ll need

  1. Raw Rice – 1 Cup
  2. Sour Raw Mango – 1 small
  3. Salt to taste


Grind to paste

  1. Mustard Seeds – ½ tsp
  2. Scraped Fresh Coconut – ½ Cup
  3. Green Chilly - 1
  4. Fresh Coriander Leaves – 1 tbsp


For Tempering

  1. Channa Dal – 1 tsp
  2. Urad Dal – 1 tsp
  3. Mustard Seeds – 1 tsp
  4. Dried Red Chillies – 1 or 2
  5. Asafoetida powder – ¼ tsp
  6. Curry Leaves – few
  7. Ground nuts – 1 tbsp
  8. Oil – 1 tbsp


Method

  1. Wash the rice and cook it until soft but not mushy. Spread on a big plate to cool.
  2. Wash peel and grate the mango.
  3. Grind together, the mustard seeds, coconut and coriander leaves to a smooth paste adding very little water.
  4. Heat a Kadai with oil, add the mustard seeds, once they start crackling add the channa dal, urad dal, groundnuts and fry until the dals turn golden.
  5. Next add in the Dry red chilli, and finally add the hing and curry leaves.
  6. Add the grated mango and a pinch of turmeric powder. Saute for about 2 to 3 minutes on medium flame.
  7. Next add the ground paste and fry for a minute.
  8. Finally add the cooked rice and salt. Mix well and remove from heat.


That’s it tangy and flavorful Mamidikaya Annam is ready. Serve with papads.

Linking this to Let’s Cook – Rice.

Monday, January 16, 2012

Bagara Baingan - A Hyderabadi Special


Hope everyone had a wonderful Pongal celebration. We too had a good time. Though I wanted to post some pongal related recipes, I could not click any pictures. So I’ll have to postpone it to some other time.
Today I am sharing this very very yummy recipe of Bagara Baingan – A Hyderabad Special.

I’m really not a fan of eggplants. I was very speculative about tasting this Hyderbadi Eggplant specialty. But just decided to do so, since the gravy looked too tempting. And I really have no regrets for having done it, this was so YUMMY! I got the recipe from my cousin, at whose place I had it and recreated it at home.  It was an instant hit with family. Since then I have made it a number of times.

Traditionally the eggplants are fried in oil and then simmered in fragrant and spicy gravy, slowly absorbing all the yummy flavors.

Don’t let the list of ingredients and procedure scare you. This is definitely a must try for all those eggplant lovers. So let’s get to the recipe:


What you’ll need
  1. Tender Purple Brinjals – 10 Nos.
  2. Onion – 2 Medium
  3. Ginger – a small piece
  4. Garlic – 3 to 4 cloves
  5. Tamarind Paste – 1 tbsp
  6. Turmeric Powder – ¼ tsp
  7. Chilly Powder – ½ tsp
  8. Sugar – ½ tsp
  9. Salt to taste


For the Masala paste
  1. Groundnuts – 1tbsp
  2. Sesame seeds/Til/ - 1 tbsp
  3. Coriander Seeds – ½ tbsp
  4. Dry Red Chillies – 2 or 3 (Adjust according to taste)
  5. Scraped Coconut – 1 tbsp
  6. Onion – 1/2


For Tempering
  1. Mustard Seeds – 1 tsp
  2. Jeera/Cumin Seeds – 1 tsp
  3. Fennel Seeds – ½ tsp
  4. Dried Red Chilly – 1
  5. Fenugreek Seeds – ¼ tsp
  6. Oil – 2 tbsp


Method

  1. Heat a Kadai, Dry roast groundnuts, sesame seeds, coriander seeds one by one and keep aside
  2. Add a tsp of oil in the same Kadai, and fry the Dry red chillies and coconut for a few minutes or till the coconut slightly changes color.
  3. Grind the groundnuts, sesame seeds, coriander seeds, red chillies, coconut, half a raw onion and salt into a coarse paste. You can add a little water while grinding.
  4. Slit brinjals, from back, in such a way that the stalk is retained.
  5. Stuff the brinjals with the stuffing. Use as required and keep the rest of the masala paste for later use.
  6. Heat a Non stick pan with oil, temper with mustard seeds, cumin seeds, fennel, fenugreek and dry red chilly.
  7. Now add in sliced onions, and sauté for about a minute.
  8. Next add in grated ginger and crushed garlic. Sauté well till the onions turn light brown.
  9. Now place the brinjals carefully into the pan, one by one and fry it for a few minutes.
  10. Cover and cook for few minutes till the brinjals are half done.
  11. Add the remaining masala paste turmeric powder, Chilly powder, tamarind paste, sugar  and salt to taste.
  12. Add a cup of water.
  13. Cover and cook on medium heat till the brinjals are completely done. Stir once in a while so as not to burn the gravy. Add more water if necessary.
  14. Garnish with fresh coriander leaves.


Serve with rice or rotis.

Wednesday, January 11, 2012

Marie Biscuit Chocolate Logs


This chocolate delight I can say, was my first attempt at making something sweet and edible. I was in Class 9 or 10, and tasted this at my friend’s place. Fell in love with it immediately and when I came to know that she was the one who had prepared it, I immediately asked for the recipe. Came home, asked mom for the ingredients, thankfully everything was available readily and prepared it right then. I enjoyed the whole process of making it and it was quite a hit. I used to prepare it whenever I had a craving to eat something chocolaty. But somewhere down the lane, I forgot about it totally. When I was browsing through Gayathri’s space for this week's Blog Hop, I saw the name Marie Biscuit Chocolate Log. Immediately I checked out the recipe and it was what I had expected. Preparing this yummy chocolate treat brought back so many sweet memories. A Big Thanks to Gayathri. You can find the original recipe here.

Makes 2 small logs
What you’ll need

  1. Marie Biscuit – 24
  2. Warm Milk – ½ cup
  3. Sugar – 5 tbsp + 1 tsp (increase or decrease acc to taste)
  4. Butter – 50 gms (approx 4 tbsp)
  5. Cocoa Powder – 1 tbsp
  6. Broken cashew nuts – a little


Method

  1. In a bowl, add the warm milk and a tsp of sugar. Mix well.
  2. Dip the Marie biscuit one by one in the milk, remove it and stack them one on top of the other. (I stacked 12 biscuits in one log.)
  3. Powder the remaining sugar.
  4. In a bowl, mix together, butter, cocoa Powder and sugar to form a smooth cream.
  5. Apply this cream on the biscuit logs, using a knife. Smoothen as much as possible.
  6. Sprinkle some broken nuts on top.
  7. Refrigerate for 2 hours.


That’s it our yummy chocolate logs are ready. Cut into pieces and serve them.

Monday, January 9, 2012

Spiced Hot Chocolate


Hot chocolate is something I order most of the times in coffee shops. When I was looking for a hot chocolate recipe to try at home, I found many spiced up versions. Thought of giving a try to this unusual combination of Chilly, Chocolate and Cinnamon. It was quite good, very chocolatey, with the wonderful flavor of cinnamon and the slight heat of the chilly. On the whole a lovely combo. Do try it.

Serves – 2
What you’ll need

  1. Milk – 2 Cups (about 200 ml)
  2. Dark Cooking Chocolate – 75 gms, chopped into small pieces
  3. Cinnamon – 1 inch stick
  4. Red Chilli Powder – a pinch
  5. Sugar – as per taste


Method

  1. Pour the milk in a vessel, add the cinnamon stick and bring it to a boil. Stir it once in a while.
  2. In the meanwhile, melt the chocolate using a double boiler.
  3. Add the melted chocolate, red chilli powder and sugar to the milk and stir well.
  4. Remove from heat and pour into mugs.


That’s it. Enjoy!
Linking this to Kalyani's Magic Mingle - Chillies and Cinnamon


Wednesday, January 4, 2012

Thiruvadhirai Kali / Thiruvadhirai Special


Thiruvadira as I’ve mentioned in my previous post, is celebrated as Lord Shiva’s Birthday in Tamil Nadu and parts of Kerala. This year it falls on the 8th of January 2012.

Think Thiruvadira, the only thing that comes to my mind is the Kali – a sweet dish made of jaggery and roasted rice powder and Kootu – a savory dish made of root vegetables like Sweet Potato, Kavatthu, Pumpkin and (Avarakkai), which is made especially on this day. It is a rare combination of sweet rice upma with a savory vegetable curry. Women wake up in the wee hours and prepare these neivedyams, which are then offered to Lord Shiva and Parvathy before sunrise. People generally visit the Shiva Temple.

Before marriage, mom would prepare everything and I would get ready in time for the neivedyam. After marriage, I would stand and closely watch my MIL prepare these traditional dishes with ease. Today I am sharing the recipe for Kali. This is my MIL’s recipe and is really fool proof. I never thought preparing Kali was so simple until I made it myself last year.


Serves – 4

What you’ll need
  1. Raw Rice – 1 Cup
  2. Moong Dal – ¼ Cup
  3. Powdered Jaggery – 2 Cup
  4. Grated Fresh Coconut – 1 Cup
  5. Green Cardamom – 4 to 5
  6. Ghee – 1 tbsp


1.       Method
  1. Wash and drain the rice. Spread the rice in a muslin cloth and let it dry in shade for about ½ an hour.
  2. Dry roast the rice in a Kadai till it starts turning reddish. Cool completely and powder into a rava consistency. Transfer into a bowl.
  3. Also roast the Moong dal till a nice aroma comes out. Cook the Moong dal with little water.
  4. Cook the rice rava with 2 and ½ cups of water for 3 whistles.
  5. In the meanwhile, Heat a Kadai, add the powdered jaggery and dissolve it using ¼ cup of water. Strain for impurities and heat the syrup again.
  6. Add the grated coconut in the Jaggery syrup.
  7. Now, add the cooked dal, and rice rava. Mix vigorously for 2 to 3 minutes until everything forms a homogenous mixture.
  8. Add the ghee and stir again.
  9. Crush the cardamom and add it. Mix again.


1.       Thiruvadira Kali is ready.

Note:

1.       2 Cups of Jaggery gave the right amount of sweetness. You can increase or decrease the amount of Jaggery according to your taste.
2.       You could also add roasted Cashewnuts and raisins, but in the traditional recipe nothing other than coconut is added.

Linking this to the Kerala Kitchen hosted by me 
Radhika's Let's Cook - Rice
Anu's Cook with Spices - Cardamom

Monday, January 2, 2012

Strawberry Milkshake


Here is a really simple recipe to kick start the New Year! Milkshake of any kind is our family favorite.  My daughter loves strawberries; somehow I am not a huge fan of these sour berries. But I sure love the lovely pink milkshake made out of these.

Talking of Milkshakes reminds me of my college days in Cochin. I have never had as many different kinds of milkshakes ever after that. There were so many different varieties available, Sharjah Shake, Oman Shake, Date Shake, and Dry Fruits Shake are just a few to name. These milkshakes used to be so thick, that we were given a straw as well as a spoon to have it.

Here’s my way of preparing the Strawberry Milkshake.


Serves: 3
What you’ll need

  1. Strawberries – 10 to 12
  2. Cold Milk – 3 Cups
  3.  Vanilla Ice Cream – 2 Scoops (Optional)
  4. Sugar – According to taste

Method

  1. Wash the berries and chop them roughly.
  2.  Blend the berries and sugar until smooth.
  3. Next add the ice cream and milk and blend until frothy.


Transfer into serving glasses. Serve chilled.

Note: Adding ice cream is totally optional, but using it gives a nice creamy texture.
You could use full cream instead of ice cream too.

Sunday, January 1, 2012

Announcing Kerala Kitchen


A very Happy New Year to all!


I take immense pleasure in announcing this month’s Kerala Kitchen.
Kerala Kitchen is an event started by Rose and Magpie which showcases Kerala dishes.
So prepare a traditional (or contemporary!)Kerala dish and send it to The Kerala Kitchen.

Here are the rules--

  1. Here at the Kerala Kitchen, we like to keep things simple, so there are no strict rules as such, and anyone can join in all the fun! It doesn't matter if you have never tried Kerala cuisine and want to learn all about it, or if you are a Pachakarani who would like to share your vast knowledge with some enthu newbies :) You are not restricted from sending your entries to any other contests, in fact we actively encourage you to participate in as many as you can!
  2. Simply cook a dish (or as many as you like) that is inspired by Kerala. Be it a traditional Malayali dish like Idiyappam or Kappa and Puzhukku, or your unique take on it, even a dish that features a flavour or ingredient that reminds you of Kerala but may not be typical Malayali fare (like coconut macarons maybe?) and post it on your blog anytime before or on the 31st of this month.
  3. No archived entries allowed.
  4. Post the recipe on your blog between Jan 1st and Jan 31st 2012, and link it to my announcement page and to the Kerala Kitchen page.
  5. Email the following details to kaverivenkatesh@gmail.com with the subject line Kerala Kitchen.

  • Your Name
  • Blog Name/URL
  • Recipe Name
  • Recipe URL
  • Photograph


Happy cooking!! Looking forward to seeing your entries!!

Related Posts Plugin for WordPress, Blogger...